Notes App that edits plain text files in DropBox to benefit from 1 month of version rollback and deletion recovery

Need:  Unlimited "Undo"

Problem: A friend seems to lose slabs of data while editing notes apps like OneNote, and Apple Notes.  What they want is unlimited undo. 
Unfortunately, neither of these these apps provide this.  If the app is saved and closed, then you have lost any chance to get back a previous version - even if the notes are shared over multiple devices - even if they are backed up to iCloud.

Partial Solution: Write from App to DropBox

Dropbox offers file version rollback for 30 days on its free account.
Write 2 Lite and it's add free version for US3.99, Write - Notes & Writing, writes plain text files directly to Dropbox.

Every time, my friend opens a note and then saves it (a setting allows you to force a save whenever a note is closed), a new version is created on Dropbox.  When he loses data, he goes to Dropbox and looks in the version history for the note until he finds the lost text.

It is not quite "unlimited undo" because he can still lose data permanently if he deletes a part of a new note before saving and does a few more actions (iPhone shake undo" only recovers one action.

Setup Recipe: 

On the iOS device, 
  • Select Settings (Gear at bottom left)
  • Turn on Auto Save (so that notes are saved every time they are closed
  • Link Dropbox account
  • Turn on Auto-sync (so that the app saves to dropbox everytime a note is closed

Dropbox - access

On iOS or desktop, just open the note at any time to view it's contents.
On desktop web view of Dropbox, you can access the saved versions


The notes are stored inside the folder, Write
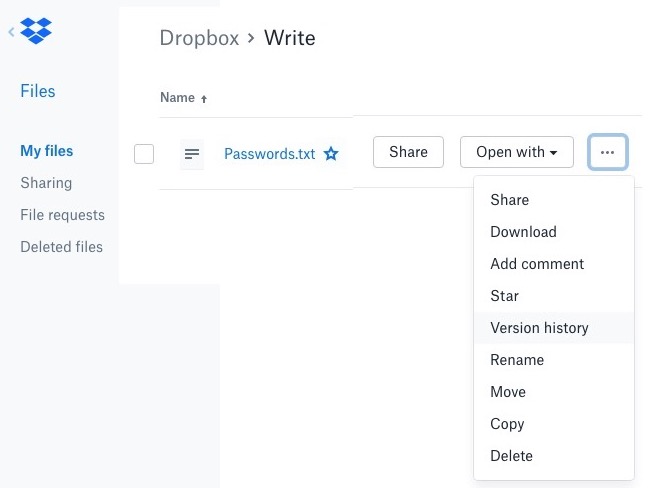
Clicking on the option icon beside a file will allow you to access the saved versions.

A months worth of versions will be available to restore from.


Not perfect, but free......

Google Maps - the ins and outs

Google Maps is a free, wonderful and, for me, indispensable tool of local and international travel.
As my iPhone turned golden through the addition of "Starred Places", I began to explore how I could add some personal info to these places to share and to aid my memory.

Recommended Use Pattern for iOS users 

  • Avoid using Saved lists in general as they do not include GPS data and so cannot be uploaded to My Maps or any other location systems.  Locations changing in the future may also not be found by the Google URL in your Saved List.
  • Use the Saved List called Want to Go for trip planning, adding notes whenever you feel it necessary.
  • Use Labeled Places during a trip to label places actually visited.
  • During or after the trip, check all your Want to Go locations and add them as Labelled Places IF you visited them (adding some text to the label is mandatory)
  • To extract this trip list, and add to My Maps Go to Google TakeOut and download Maps

  • Locate the "Labelled places.json" file and drag into https://json-csv.com/ and download the converted csv file.
  • Open the csv in an editor (e.g. sheets, excel etc) and rename the headings e.g.  Lat, Long, etc

  • Open Google My Maps and import the data as a new layer into an existing map or a new one

  • Upload the csv into Google My Maps as a new map, or an new layer in an existing map.
  • Now you can annotate the map:
    • Add unlimited notes to each location (unfortunately any links in your notes will not be clickable)
    • Add your own photos to notes (although these pictures have a habit of disappearing occasionally for no known reason)
    • Change the location icons to the built in set or even your own (e.g. numbered)
    • Add travel paths.

Recommended Use Pattern for Android Users

  • Use "Want to Go" for trip planning, adding notes whenever you feel it necessary
  • Use My Maps Android app, during your trip to add places and notes that you actually visited

Google, please .......

  • Develop a My Maps app for iOS
  • Add GPS data to Saved Places csv exports so that they can be uploaded into My Maps
  • Add csv export option from My Maps.
    • KML and MMZ conversion add extra complexity to combining data.  
    • My Maps allows csv import, why not csv output ?
    • csv is the easiest way to combined data and then reimport.  
    • This will get around the problem of unreliability of dragging locations between layers in My Maps
    • This will get around the limitation of 10 layers in My Maps. 
  • Add Import into existing layer to My Maps (because dragging locations from one map to another is so buggy
  • Add Export to CSV from Table View in My Maps
  • Allow Copy and Paste rows in Table View in My Maps

Details of Google Map Operations as at APR2020

Google Maps Family Data Relationships

This is when I discovered the Google Maps data connectivity was wonderfully complex - but less than elegant. What we have (as at APR2020) is:

Data/Lists/ Labels in Google Maps:

  • Labelled - Blue Flag
    • Visibility: UNDER all other Saved Places
    • Export via Google TakeOut - Maps - Labelled places.json
  • Starred Places - Yellow Star
    • Visibility (mobile) - UNDER Favourite Places; Above all other lists
    • Visibility (desktop) - UNDER all Saved Places (Why is this visibility different ???)
    • Export via Google TakeOut - Maps (your places) - Saved Places.json
  • Favourite Places - Red Heart 
    • Visibility: ABOVE all other Saved Places
    • Export via Google TakeOut - Saved - Favourites.csv (No GeloLocation/GPS data)
  • Saved places - Custom Lists
    • Visibility (Mobile) under Favourite Places, Saved Places and Labelled Places
    • Export via Google TakeOut - Saved - cyprus.csv (No GeloLocation/GPS data)

Conversion between formats exported by Google TakeOut:

  • CSV exports with title and Google Maps URL but without GPS data
  • JSON exports with many fields including title and GPS and can be converted to CSV easily online at https://json-csv.com/. After converting, edit csv to get rid of redundant data and resequence for cleanest and most useful My Maps data upload.
  • KMZ can be converted to CSV at https://mygeodata.cloud/converter/kmz-to-csv

Labelled Places

Google says "Personal places will be used across Google products, for personalized recommendations, and for more useful ads."


  • The Labeled Places label usually precedes or sometimes replaces the google map name when viewing the map:
  • On iOS devices, different sequences need to be used to add a label depending on whether the location is already a named map location. 
  • Labels can be up to 40 characters long
  • Labelled places can be quickly integrated into Google My Maps:
    • exported in JSON format (which includes the GeoLocation GPS) through Google TakeOut
    • converted to CSV and headings improved
    • imported into Google My Maps
    • deleted from Google Maps (the desktop computer deletion is far faster than the sequence on a mobile device)

Google Maps - Your Places - Saved

  • Saved lists allow users to add places to 
    • predefined lists: Favourites, Want to Go and Starred Places.
    • user defined lists
  • The visibility of Saved Lists can be turned off and on.
  • Each list can be shared through a unique URL with friends
  • All lists except for Starred places can be exported through Google TakeOut which exports them as seperate csv files (e.g. Saved/cyprus.csv) with NO Geolocation GPS Data
  • csv does NOT contain GPS location data
  • In Google Maps, lists are displayed in order of last use.
  • On iOS devices, notes of unlimited (?) length can be added at the same time as adding the place to the list

  • On Desktops, notes of unlimited (?) length can be added by going to Your Places - Saved - Edit List
  • Starred places is a special list which is synchronised with Google Bookmarks (i.e. every location added to Starred places creates a Google Bookmark.  
    • Deleting the Google Bookmark will delete the starred place on Google Maps).  
    • Google bookmarks can have Labels and Notes added to them, but these do not display in Google Maps.  
    • Google Bookmarks can only be exported as HTML which is very difficult to convert to CSV for import into Google My Maps.
  • Starred places cannot have a note added
  • Starred places are not exported with other Saved Places lists. 
  • Starred places are exported from Google TakeOut as Maps (your places)/Saved Places.json which includes the GPS location (unlike all other saved lists).

Google Maps - Visited Places 


  • These are locations from your timeline (if you have allowed Google to track your locations through Google Maps)
  • These locations can be exported through Google TakeOut as Location History in JSON format which includes GPS data.

Google Maps - My Maps


  • Google My Maps is the most sophisticated mapping tool within the Google system.  It allows:
    • any number of user created maps (limited only by Google Drive storage), which can contain:
      • up to 10 seperate layers, with
      • each layer having up to 2000 seperate locations
    • each location can have 
      • custom notes of unlimited length in user defined fields.  URL's within the notes are active when viewed on a desktop, but inactive when viewed on iOS mobile devices.  (This is annoying, as it means that information links that would be useful during a trip cannot be accessed from an iOS device.  (I wonder if this is true for the Andoid MyMaps App).
      • unlimited custom images displayed with the location detail.  These can be uploaded from your phone, or can be linked to your photo library or any web image.
      • custom icons
    • the map data can be:
      • viewed and edited in table format
      • exported through Google TakeOut creating a seperate KMZ file for each Map
      • exported from within My Maps creating a seperate KML or KMZ file for each map layer.
    • Locations can be moved between layers (as long as the layers have the same fields)

  • Google My Maps has the near fatal flaw of not being able to be edited in any way from iOS devices.  i.e. it is read only.
  • Android OS users have full access via the My Maps Android app

Google Maps - Labelled places: A flexible way to record places while you travel

  • Labelled places allows you to record locations before and during trips including a 35 character annotation.
  • If I location recorded before the trip was not memorable, just delete the label and it will disappear from the list.
  • After the trip, Labelled places can be downloaded as a seperate JSON file from Google TakeOut (export the Maps - All data Types.)
  • The Labeled places.json file can then be opened in a text editor:

  • Improve the headings [and add columns that you want. Remember that, after import into My Maps, locations can only be moved around between layers if they have the same data columns (fields)]: 
  • Upload the csv into My Maps as a new map, or an new layer in an existing map.

OR
  • (much more reliable, but more work) export two layers individually to KML, convert them to CSV, combine them and re-import as one layer.

Google Maps - My Maps - The best way to store and view locations with personal annotations

  • Google Maps on desktop or mobile displays maps PLUS any lists that you have not hidden

  • When you want to call up a list of places that you have stored and annotated, just go to Google My Maps and turn on the map that contains the information you wish to use.

  • Clicking on any location marker will display your annotations and any pictures that you have linked.

Google Maps System Quirks

  • Google TakeOut exports My Maps Data in KMZ format.  I can only find one site, mygeodata.cloud  that reliably converts from this format to CSV, and it only allows 3 free conversions per month.
  • KMZ files are a compressed package of multiple layers of KML data.  They can be opened by some text editors (e.g. MacOS TextWrangler):

  • The KML code within KMZ files is not correctly interpreted by most KML to CSV conversion websites.  So, if you want easy and accurate conversion to CSV, the best option is to export KML from My Maps one layer at a time:


  • Google My Maps Export to KML then to CSV creates a range of additional fields to the ones that were imported from CSV:
    • CSV import had column headings of:
      • Trip Description
      • Category
      • Notes
      • Address
      • Latitude
      • Longitude
    • KML export has columns of:
      • name  e.g. Tiger Sky Tower, Sentosa Island
      • description  e.g. Trip Description: Singapore 2002 c Chelt SC
        Category: Place
        Notes:
        Address: 41 Imbiah Road, Sentosa Island, Singapore 099707
        Latitude: 1.2549754
        Longitude: 103.8175937
  • Google My Maps - Export to KML also sometimes generates KML files that cannot be recognised by KML to CSV convertors:
    • www.convertcsv.com says Invalid KML
    • http://www.monster.com.tw/kml2csv says Format Error
    • https://www.acugis.com/2csv/ does not work for any KML I have tried !!
    • https://choonchernlim.com/kmlcsv/ is a desktop application requiring install of Java.  It reports: ERROR: An unexpected error has occured: Unable to read KML file..
    • https://mygeodata.cloud/converter/kmz-to-csv (online service with 3 free conversions per month) says: Import error.  No spatial data were recognized in your uploaded data. We are sorry.  Make sure you have uploaded all relevant files of the dataset.
    • OR even Google My Maps which reports "Aww Snap!: 1 column was skipped when parsing the KML file, because there were too many columns, or some column names were too long or contained invalid characters. You may want to fix the file and upload again."
    • One solution: Import the troublesome KML into a new Google My Map and it will reject the data column/field that is causing the problem (usually it is the hidden HTML field "description")
  • A more complete solution would allow any of the Google Maps suite to export/import to each other in at least one common format e.g. KML, JSON or CSV.  Ideally in a range of formats..... 

Google Backup & Sync - What it does and doesn't do (yet !?) (Dec 2017)

Google "Backup & Sync" App replaces both Google Drive App.

The Google Photos Desktop Uploader has been discontinued and its functionality is NOT included in the new App.

The new app not only "watches" the Google Drive Folder on your computer, but offers to "watch" additional folders (by default Desktop, Documents, and Pictures, but you can add any other folders.


Be careful, as the pictures folder contents WILL count against your google storage quota.

The other preferences are poorly described:

  • Photo and video upload size.  This choice plainly implies that all photos in My Mac will be uploaded at "High Quality" and will therefore use "free unlimited storage". 

    This is NOT true as all photos in the Pictures folder are backed up to Google Drive and count against your storage quota.
    The "Learn more" link takes you to a Google Photos help page.
  • Removing/ Deleting Items.  This choice DOES relate to Google drive and offers very basic control of your sync settings: 
    • Remove items everywhere: When you delete something on your computer or drive.google.com, it will be deleted everywhere.
    • Don’t remove items everywhere: When you delete something on your computer, it will stay on drive.google.com.
    • Ask me before removing items everywhere: When you delete something on your computer, it will ask if you want to delete it everywhere.
    • Most people will choose the default of "remove items everywhere" and rely on local computer backups to retrieve items removed in error.  The items can be retreived for up to 30 days from your Google Drive "bin" folder.
  • Upload newly added photos and videos to Google Photos:  This option does not seem to do ANYTHING.  
    • Photos added to Google Drive - "My Mac" Pictures Folder do not appear in Google Photos
    • Photos added to Google Drive Folder do not appear in Google Photos
    • Photos added to Google Drive - "USB Devices" (i.e. photo storage chip) do not appear in Google Photos


To add photos to Google Photos, you need to use the Google Photos app on your mobile phone, OR upload groups of photo files via the Google Photos web page.  This method does NOT allow folders to be selected (as was possible in the old Desktop Uploader), so you need to get you photos out of folders, or upload each folder separately.

Overall, this seems like an App released before it was thought through.

Google Backup & Sync SHOULD be improved with: 
  • New tab for Google Photos containing:
    • Photo and video upload size setting
    • Ability to add watched folders for google photo uploads
      OR
    • Ability to point to a folder and upload all photos to Google Photos
  • Ability to select whether attached storage (like photo storage chips) are uploaded to Google drive or Google Photos.

Site Map

    Google Cloud Platform Static website

  • Display instructions https://cloud.google.com/storage/docs/hosting-static-website for instructions
    • Create a google cloud account https://cloud.google.com  (requires credit card details) 
    • Register domain c go daddy ($3 ! for one year)
    • Verify the domain using Google automatic tool  https://www.google.com/webmasters/verification/home?hl=en
    • Log into Go Daddy and open domain - DNS Zone File - Edit existing www record:
      • Type: CNAME
      • Host: www.wisywgit.space  (or whatever you have registered))
      • Points to: c.storage.googleapis.com
      • TTL: 1 hour (default value)
    • Log into https://console.cloud.google.com/storage/browser
    • Create a bucket with the name of the website e.g. www.wisywgit.space (This failed for me for a bout an hour before working.  Perhaps server settings from the verification had not reached the console server ?)
      • Edit Object Default permissions
      • Add Permission: User - allUsers - Reader (see https://cloud.google.com/storage/docs/cloud-console#_sharingdata)
    •  Edit website configuration:
      • type the filename for the main page and Save  (the default index.html is already there in grey, but must be typed and saved to execute it)

    Picasa Desktop Application (Mac) - Advanced Search - Dates

    The absence of online reference manuals is a common and annoying feature of so many major software systems such as google and apple.
    They provide user manuals that assume a certain common workflow, but leave out the detail that would allow a user to understand what the software is programmed to do so that they can predict other workflow outcomes.

    Picasa (purchased by google and now being retired over the next decade) has always lacked a manual or any comprehensive user guide.

    So it's up to the usual patchwork quilt created by users.

    Date searches:


    At the top of the Picasa window is the search pane.

    Simple searches are usually successful based on any "word".  Picasa seems to search 

    Examples of date searches:
    • 2015 identifies all pictures with 2015 in title or within their metadata.
      It also identifies a large number of photos which don't seem to have 2015 anywhere in folder title, file title, or metadata ????
    • 2015:02 selects all photos with "Camera Date" or Digitized Date" or "Modified Date" during Feb 2015 far more reliably.
    • 2015 02 unfortunately selects all photos with either "2014" or "02".  Not very useful.
    • 2015:02:11 selects all pictures with a "Camera Date" or Digitized Date" or "Modified Date" of 11 Feb 2015.  Very specific.
    • I cannot find any syntax that allows searches for a date range.
    • The slider bar allows narrowing of pictures selected by a search term e.g. "Alan" to "2 days old" (slide to the far right) to as old as you like (mine go back 20 years !).
      The problem is that the start date is always fixed at "now".
    See also:

    PS:  You can still download Picasa 3.9 for Mac OSX from http://mac.filehorse.com/download-picasa/


    Picasa Web Albums - Refresh Online Status

    I can't find any Picasa manual and the Mac version has no built in help documents, so I am guessing and experimenting on this one.
    It is hard to tell if a function is working as it should if there is not statement of what the function was intended to do .........

    I have found that (on Mac v3.9.1.306), if Sync to web is on for the album, "Refresh Online Status" compares of files on computer and the matching Picasa web album.
    If Sync to web is off it has no effect.
    If there are photos online that are not on in the desktop album, it will often download them to the computer (sometimes inexplicably, it ignores some online photos and refuses to download them).
    If there are videos online that are not on in the desktop album, it will always ignore them.

    I was hoping that it would download photos and videos from the online album, so that I could see them on the computer and delete them while checking the "delete the online copy too" button.  In its current state it is pretty useless to me.

    The "Sync to web" album setting is not a sync at all, but rather an "immediately upload any new items" button.

    To sync, I have found it easier to:

    • "view online" the album; "organise" to display thumbs of all items; drag a boz arouns all items to select them; and delete them. 
    • view the album through the desktop picasa application, highlight all items in the album and upload.

    You do not want to use the "Delete Online Album", because it destroys any album sharing links you might have set up.

    I know this is pretty messy, but it is the easiest way to overcome the problem that picasa does not have a true "sync" capability.

    What the programmer should do, is to change the Sync options to a much cleaner set of functions:


    MS Word VBA code to display different versions of a document by making paragraphs invisible based on a code

    Perhaps you want 3 versions of a document, but do not want to maintain 3 seperate files.
    It may be handy to be able to see all versions at one time to check all content.
    Having all paragraphs in one document means that an update to a paragraph will automatically update all versions that use that paragraph.

    The VBA code that I used is here.
    The word document containing this macro is here.

    In the document, command-6 has been assigned to run the macro.

    The macro asks for a key letter.
    If the key letter is contained within the first marker word of a paragraph, then the paragraph (minus the first word) will be displayed.
    If a paragraph has one or less characters, then it is also displayed (to preserve blank lines).
    (I set the minimum for testing at 2 characters as I can use one letter e.g. A to display all paragraphs)
    All other paragraphs are marked as hidden.


    Vertical Scrolling using HTML Marquee

    Blogger implements the marquee command,
    Blah blah Blah blah Blah blah Blah blah Blah blah Blah blah Blah blah Blah blah Blah blah Blah blah Blah blah Blah blah Blah blah Blah blah Blah blah Blah blah Blah blah Blah blah Blah blah Blah blah Blah blah Blah blah Blah blah Blah blah Blah blah Blah blah Blah blah Blah blah Blah blah Blah blah Blah blah Blah blah Blah blah Blah blah Blah blah Blah blah Blah blah Blah blah Blah blah Blah blah Blah blah Blah blah Blah blah Blah blah Blah blah Blah blah Blah blah Blah blah Blah blah Blah blah Blah blah Blah blah Blah blah Blah blah Blah blah Blah blah Blah blah Blah blah Blah blah Blah blah Blah blah


    In blogger "compose" mode, it ignores the settings such as:
    • direction="up" (for vertical scroll)
    • height="300" (for controlling height of vertical scroll)
    • scrollamount="2" (for controlling the speed of the scroll)
    • scrolldelay="20" (for controlling the delay before scrolling starts
    One published the effect is implemented.
    Find the code here 

    Tweaking the iOS Music app for the Classical Listener

    Setup so that a tap on album art displays track info


    The best way to display full track title and artist info is through a Doug Adams script called: Selected Tags to Lyrics. After using the script and syncing your iPhone, the track and artist info is displayed just by tapping the album cover !


    Apple has neglected the "Classical" music listener from the start  - especially in iOS.

    On the iPhone Music app, most of the screen is taken up by the album image.  The track progress bar is so this as to be almost invisible.  The track name is below and underneath that is the artist name displayed in a tiny font.   Both these lines scroll and pause periodically making them harder to read and requiring a significant wait before you get the info you need.

    iOS 9.2 release mentions an upgrade to Classical Music browsing which fails to address the key issue: Ability to display the Track name, Artist (and optionally, the Album name) in a stable, good size font.

    Applescript: Selected Tags to Lyrics


    The script is very simple to install (just unzip and place in your itunes scripts folder and it is immediately active.  When installed, you just select one or a thousand tracks and ....


    You select which fields you want copied to the lyrics filed of the track:


    I only want the Name and Artist, but many would want the Album name as well.
    Then the script asks if you want to prepend (place at start) of existing lyrics, or replace.


    As I have some opera tracks with librettos that I want to keep, and other tracks with notes, I always choose Prepend for safety.  (When I manually add lyrics, I also add the word "lyrics" to the grouping tag so that I can select or avoid selecting these tracks in future.)
    Now, sync you iPhone and open the Music App to enjoy easy access to a static large display of the track and artist info just by tapping the album cover !


    PS Doug provides these scripts free but asks for a donation to keep him working and feeling appreciated. 
    See also: Tracksift 2 - Creates playlist from selected tracks where they have no lyrics and many other options.